Showing posts with label Google Drive. Show all posts

Thursday, 8 September 2016

A Beginner's Guide to Google Apps for Education

At a recent parent forum, we had requests for a workshop on Google Apps, so parents can understand what their child is doing at school and support them at home.

We focused on Google Docs, Google Drive and GMail. You can see a summary of what we spoke about in the presentation below.

We used the context of Favourite Restaurants in Singapore to show some of the features of docs. Check it out!


For more self-directed learning with Google Apps, try the Google Apps Learning Centre.


Monday, 6 June 2016

Digital Bytes 6th June 2016


Screen Shot 2016-06-06 at 8.39.46 am.png
Google Drive Templates - Because Caring is Sharing

Who doesn’t love a good template? Erifili Davis has collated a post full of excellent Google Drive Templates, including the FakeBook one shown here.

Check out her suggestions on timelines, presentations, written projects and social media templates.
What Students Feel Learning in a State of Flow

“Flow,” is a state of being where one is completely engaged and absorbed by what they are doing.

Jackie Gerstein believes that one of the roles of educators today is to help set up conditions so learners achieve a state of flow. Read more about Gerstein’s suggestions for how to make this happen.

3 End of Year Reflection Strategies for Students

As the academic year comes to a close, many teachers are considering options for reflection so as to celebrate and highlight growth in learning.

Rebecca Alber has put together some strategies that will engage students, rather than turn them off. Check them out!

Monday, 23 May 2016

Digital Bytes 23 May


Google Cultural Institute

Some of you may be familiar with the Google Art project which gives everyone access to the details of amazing pieces of art.
It is part of a larger project called the Google Cultural Institute which includes Historic Moments and World Wonders.
Calm-Website.jpg
Tech Tools to Help you Relax

Report writing, exhibition and end of year farewells - perhaps it’s time for some tech tools to help you relax!

This round up of suggestions might give you just the calm you need to weather the end-of-school-year storm.
Great Apps to connect to Google Drive

Videonotes is a fantastic app that allows students to write timestamped notes on videos that are online.
It is just one app that connects easily to your Google Drive. Here are seven other apps that you can connect to your Drive including two apps, Pixlr Express and Pixlr Editor that can help you edit photos.

Friday, 6 May 2016

Leaving Well with Google - updated!

[Editor note: We have updated this very important post from our previous 2013 version! The information below is current as of 6 May 2016.]

This is always a difficult time of year as we say "see ya later" to colleagues, students and families who are leaving our school. To make the transition a little easier, here are some ideas on taking your Google items with you.

The first step to make the transition is to create a personal Google account for yourself. This will become the new home for all the things you'd like to transfer from your account at UWCSEA.

To take things with you, we will use Google Takeout, but first it's important to separate the things you want to leave behind from the things you want to take with you.

Google Drive

If you have any items you need to leave behind because they are needed by colleagues or friends, you'll need to make sure that your department account is added as an editor of the document. An easy way to do this is to create a new folder and add the department account as editor to the folder. Then, Add (hold down Option+drag) documents to this folder. They will automatically be editable by the department account.


For really important documents, you might consider transferring ownership over to the department account.

You'll also need to think about those files that you will want to take with you when you leave. One systematic way to do this is to create a separate folder in your My Drive where you collect these files (e.g. "Take Out" folder). As you go through documents in other parts of your Drive, add them to this "Take Out" folder -- be sure you add and not move by holding down the Option key when you drag to your new folder.

Cleaning your digital debris can be a daunting task, but it's necessary to make sure documents are left with those who depend on them, and that you have the documents you need when you depart.


Gmail

Just like with Drive, you should take this opportunity to sort through your email. If there are emails that people in your department or team need that they have not been cc'd on, please take some time to filter these and forward them to the relevant people.

Similar to how you organized your Drive, in GMail you can create a label for all the email you intend to take with you. When you go to use Google Takeout later, you can then choose if you want to bundle all of your email into that archive, or if you'd just like to take email with a particular label.


Sites

Before you leave, it's important to make sure that the Google Sites you've created for UWCSEA that need to remain behind -- e.g. event sites, curriculum pages, etc. -- have ownership changed to your department account. 

1. Go to the site you wish to transfer and click the Settings icon, then choose "Manage Site."
2. Click "Sharing and Permissions" and add the department account an "owner" of the site (you can have multiple owners of a site). Click "OK."


You may want to preserve some of the Google Sites you've created in the college and keep copies for yourself later. To do this, the steps are similar: 

1. Go to the site you wish to transfer and click the Settings icon, then choose "Manage Site."
2. Click on "Sharing and Permissions" and make your personal Google account an "owner" of the site.
3. Log in to your personal Google account and go to the address of the site you're transferring. Again, go to "Manage Site" and from the "General" section, press the "Copy this Site" button. 

This will make a copy of your UWCSEA site in your personal Google account space. 

WARNING: linked or embedded assets like YouTube videos, Google Drive content, or images may be broken and need to be re-linked, embedded or uploaded.


GMail, Blogger, Photos, YouTube, Google Drive, and more
Content from a variety of Google services can be transferred using Google Takeout. This utility allows you to select what services you'd like to take data from and bundles them into open and portable formats that you can then transfer to your personal Google account. 

For example, Takeout lets you download the original video from things you've uploaded to YouTube.
Takeout allows you to specify folders you'd like to export from your Google Drive (you don't have to take the whole thing). Note that you cannot export folders and documents from Drive where you are not the owner.

Once you've selected all the services and specific data, you can click "Next" and Google will tell you it is preparing your archive and will email you when it is ready. It might take a few hours or a few days, depending on how much data you have, but eventually you will get a .zip folder with all of the files.  Double click the downloaded .zip folder to uncompress them. Using Google Chrome, log into your personal Google account and upload the entire folder to your new account.


If you want more detail about this archive, or have questions about how to use Google Takeout, see this useful site from Google's Data Liberation Front.

We're sad to see you go, but wish you all the best. Hopefully this will make it a little easier to enjoy your last few moments here and not worry so much about your Google goodies.

Monday, 14 September 2015

Digital Bytes Sept. 14, 2015

We have a fantastic set of articles in this week's digital bytes. 

The first short yet extremely useful article is about using art to start student's reading. The second article is about new features in Google Drive and the third is about what digital storytelling is and isn't.


Monday, 25 May 2015

Digital Bytes May 25, 2015

This week's Digital Bytes has the following articles: 21 Ways to use photography and images in your classroom, Top 6 sites for free videos, photos, and audio, and managing your computer's linked Google Drive folder.


Thursday, 28 August 2014

Digital Portfolios - Organising your Google Drive Folders

At UWCSEA East, we are using Digital Portfolios for Grades 3-5. These take the form of Google Sites.

One technique we are using is embedding Google Drive folders in their sites, so content can be populated automatically.

Students already have folders set up in their Google Drive (via Hapara, or Teacher Dashboard), so the following tutorial shows how students set up their folders ready for embedding in their sites.


Friday, 22 August 2014

Attaching New Keynote or Pages Files to Email or Putting Them in Google Drive

When using the new Keynote or Pages applications, you cannot attach the files directly to emails or put them right in to Google Drive. There are two simple solutions to fix this problem. Save the files as Keynote '09 or Pages '09 files or compress the files before attaching them to emails or inserting them into Google Drive. Have a look at the screencast.


Wednesday, 18 June 2014

Writing a Real Book Makes a Difference to Students

I have been lucky enough to work with our Grade 3s in the publishing phase of their informational book writing process. What an adventure!

Steve Kay (the Digital Literacy mentor) and I both hoped the team might consider creating digital books with iBooks Author, and were thrilled when all 7 classes got on board.

We set up a time to take all the teachers through some of the features, and they practised creating their own book, complete with sourcing Creative Commons images, and experimenting with widgets. This step was crucial, as it meant we had a real partnership when introducing iBooks Author to the students.

One of our aims was to help students make connections between the functions available on Pages and those on iBooks Author. We began by getting students in pairs (and later, groups) to identify the similarities and differences between the two programmes. This encouraged them to explore the menus and try different features before getting started. We shared these as a class.

Prior to this, with their class teacher, the students studied non-fiction informational texts and noted the features common in the genre, such as labelled diagrams, images and tables. They chose something they knew very well to write about. There was a diverse range of subjects selected - from Christianity to Minecraft - and everything in between!

Students wrote their drafts in a Google Docs template provided by their teacher. It was peer edited using the commenting function. Words to be included in the glossary were made bold, and images they thought they might look for were identified in a different colour on the side (see example below).


Once the text was ready, it was time to transfer it to iBooks Author, and add the features the students felt would help convey an understanding of their topic to their reader.

Students used Creative Commons Search to look for images to use in their books. Referencing the majority of these images was made extremely easy due to the use of Cogdog's Flickr CC image bookmarklet (drag the blue button to your bookmarks bar and click to attribute from Flickr).

Building on our work with the design principles of CARP (Contrast, Alignment, Repetition & Proximity), students worked carefully to make sure their choice of colours fit their content, was easy to read, chose a font which matched their content, and considered the alignment of their text boxes etc. They were very mindful and deliberate in their choices.

One of the excellent features in iBooks Author for informational books is the interactive image widget. It allows you to zoom into parts of an image, and provide more details. Labelling the parts of a flower, then zooming in to each part and getting more information is one example of how this can work. This was very popular with the students.

In addition, some students chose to add 3D images, which they sourced from Sketchup's 3D warehouse. The ability to get just about any 3D image (from Touch Rugby pitches to the latest Lamborghini) made this a popular option!

A Dad correctly guesses a review question
Many pupils used the review tool to create interactive quizzes to check for understanding of their content. Being able to use images and labeling diagrams in the reviews as well as typical multi-choice questions meant there was a lot of variety.

Students added glossary terms they identified in their draft writing, and it was lovely to see their definitions written in their own words.

Some chose to record their blurb as their intro media to the book, while others decided to create keynote files to add.

Once finished, students exported their finished books as .ibooks files, and uploaded them to Google Drive. This allowed for easy transfer to the iPads.

I loved watching their faces as they opened their books for the first time.

When reflecting on the process, the students I spoke to were unanimous about their enthusiasm for using iBooks Author as the platform for writing their book. They were able to articulate many reasons for this, however, one student summed it up nicely by saying:

"Google Docs is good for drafting, Pages is good for posters, but iBooks Author is best for books, because we're supposed to be writing a book! This feels like a REAL book, but better, because we can add all the extra features for interactivity."

A celebration followed, where students showed their completed books to their very impressed parents. The final piece in the puzzle is our growing list of published authors on the Write Now bookstore. Follow this link for examples of our published books. More will be added as they come to hand.

A huge thank you to the tireless Grade 3 teachers for all you have done in getting students to this stage.

Photography by Dave Caleb

Wednesday, 27 November 2013

Exporting from Explain Everything to Google Drive

Explain Everything is a great app on the iPads for students to record their thinking about a particular subject.

We have had some problems exporting the movie to the camera roll when the movie gets too long.

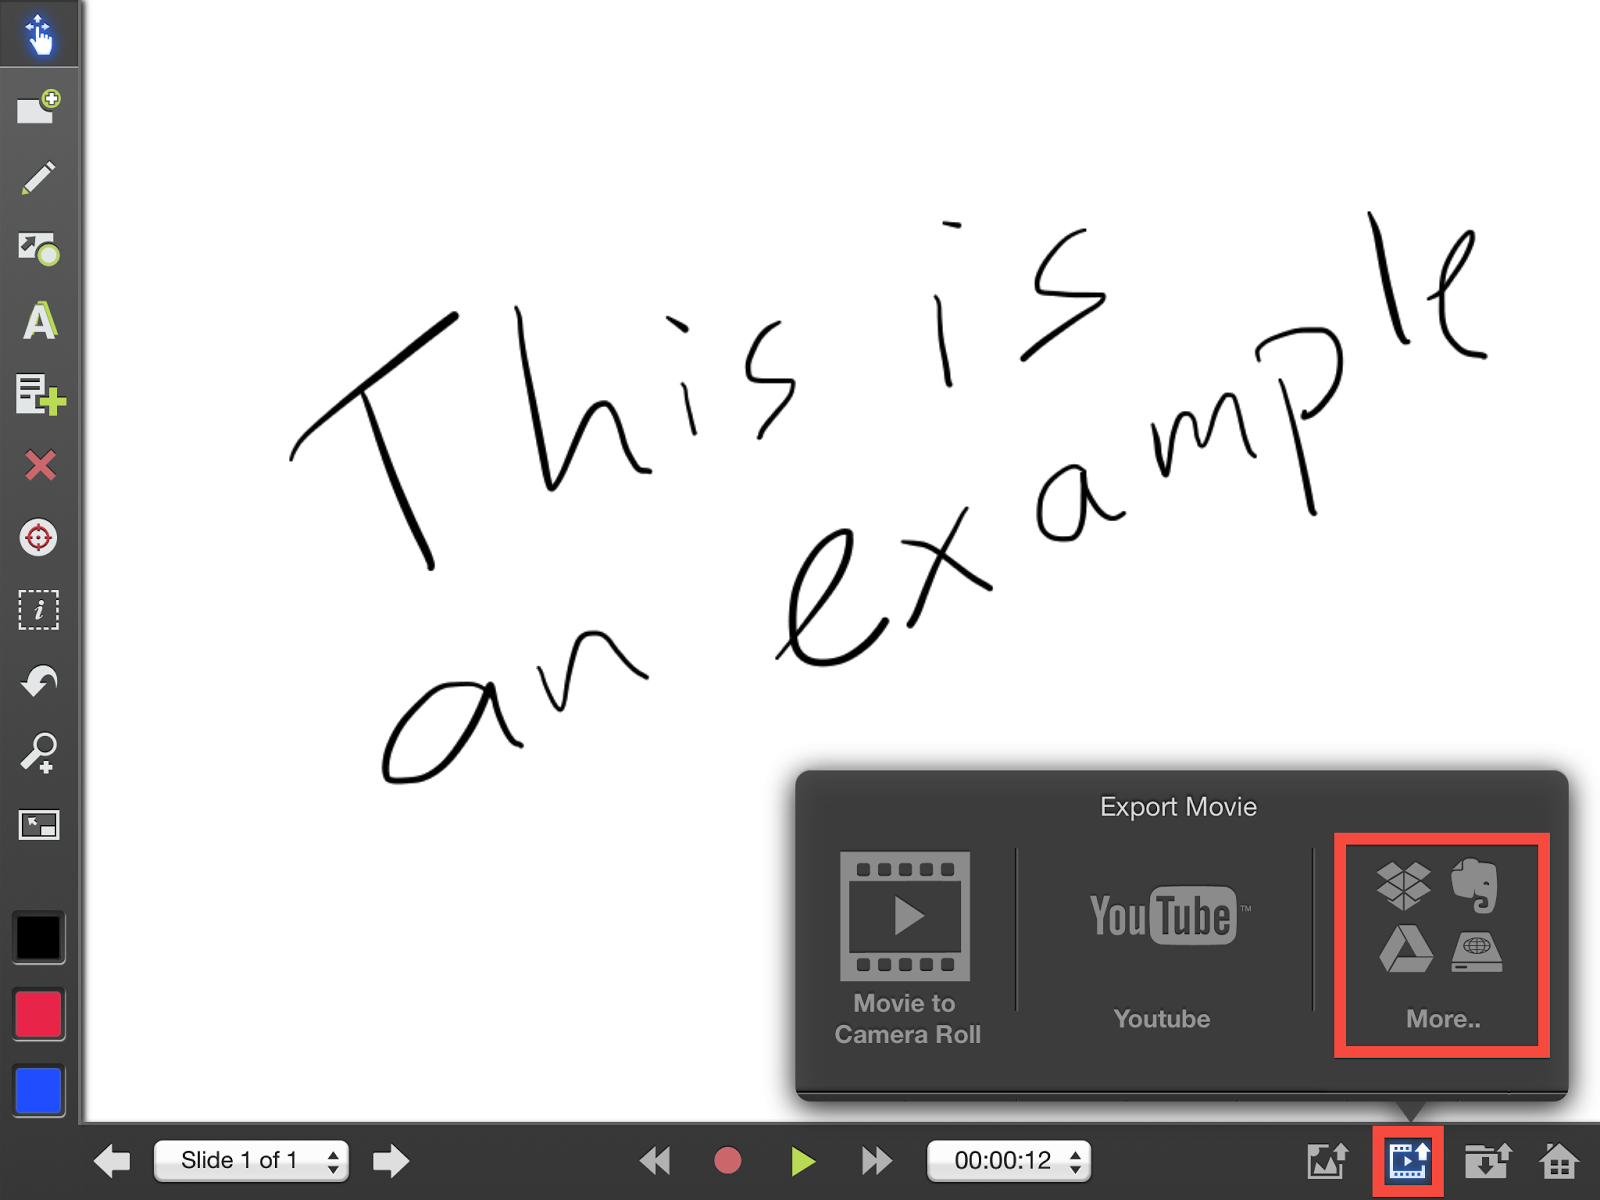
A solution to this is to export the completed movie to your Google Drive account. You can even export the Explain Everything file to your Google Drive so you can access it later on a different iPad.

Once you have created a movie in Explain Everything, click on the movie export icon in the bottom right of the screen.

Click on the Google Drive tab on the bottom and then you will be prompted to sign in to Google Drive.


You will be prompted to sign in to Google Drive. **Very important - don't forget to include the gapps part of your email address. Ex. dac@gapps.uwcsea.edu.sg


You will then get a screen which asks if the Explain Everything app is allowed to access some of your information. Click accept. **Note: sometimes the keyboard may be in the way of the accept button. To get the keyboard out of the way, simply touch the keyboard button in the bottom right of the screen.


You can choose to either save the video file or the project. If you are done and don't need to edit the project anymore, then save the video file. If you would like to continue to edit the project later, touch the project tab.


You will be prompted to give it a name. You can also choose the folder that you would like to put the file into. Choose a name that will help you find your movie later.


The video will then be saved to your Google Drive and you will get a progress box.


Now the file has been uploaded to your Google Drive. 

Remember that you are still logged into your Google drive account. You will need to log out so other people can't access your account. To do that, go to the home page of Explain Everything (click on the house in the bottom right corner of the screen) and click on the gear in the top right of the screen. Then click on the Accounts tab and slide the Google Drive switch from "On" to "Log In". 


**Note - If you save a project to your drive, and you want to open it back in Explain Everything, you will need to open it from the Google Drive app on the iPad (Not from Explain Everything)


Wednesday, 16 January 2013

Sharing Student Work on Google Sites

At UWCSEA we use digital tools frequently for student learning. Grade 3-5 students have a Google Site which they are using to house their digital content. Below are some workflows for sharing student work to Google Sites easily.

From Pages/Keynote

Google Sites does not integrate easily with .pages or .key files, but there is a work around. Follow these steps to get your Pages/Keynote documents onto Google Sites

1. Open your Pages Document and click on File -> Export -> PDF


2. Click Next


3. Save to your desktop


4. Open Google Drive

5. Click on Upload -> Files and select PDF to upload (or, simply drag PDF into Google Drive)


6. Click on Share, and make your document viewable to anyone at UWC with the link, or Public on the web


7. Click on File -> Embed this PDF File


8. Copy the HTML Code


9. Go to your Google Sites, and start a new post for the work you want to share.

10. Click on the HTML button


11. Paste the HTML code and click Update

12. Your document will be visible once you press Save.

Here's a quick video to show the process if you prefer.


How to Embed a PDF into a Google Site from UWC South East Asia on Vimeo.

Movies

Google Drive can help you embed your movies, if they are in .mov or .mp4 or .m4v format. Follow these steps:

1. Open Google Drive

2. Click on Upload -> Files and select Movie to upload (or, simply drag Movie into Google Drive)

3. Click on Share, and make your document viewable to anyone at UWC with the link, or Public on the web


4. Go to your Google Sites, and start a new post for the work you want to share.

5. Click on Insert -> Video -> Google Docs Video


6. Search for the video you wish to include by typing its title.

7. Click on the video and press Select 

8. Deselect Include Title, and press Save


9. Choose how you want it aligned on the page. When you are ready, click on Save or Save Draft to see the embedded video.


Google Docs

Google Docs are the easiest to embed in a Google site. Follow these steps:

1. Go to your Google Sites, and start a new post for the work you want to share.

2. Click on Insert -> Document


3. Type in the title of the Doc you want to insert. Tick the Doc you want and click Select.

4. Deselect Include Title and click Save


5. Choose the alignment you would like. When you are ready, click on Save or Save Draft to see the embedded document.